Ads 468x60px

Showing posts with label Spread/Chutney/Masala. Show all posts

Tuesday, 10 July 2012

Tomato Pickle


For this recipe, visit http://www.foodomania.com
Link to this recipe - http://foodomania.com/tomato-pickle/

Wednesday, 27 June 2012

Spicy Mango Pickle (Avakkai)

There are a gazillion ways of making pickle. This mango pickle, or Avakkai Oorgai (read: aa-vuh-kkaay oor-gaai) as we Tamilians call it, is our family recipe. This is how ladies of my family have been making for generations.

Monday, 25 June 2012

Rasam Powder

Say hello to Ma. She's been kind enough (or.. should I say, excited! :P) to share her 'secret' Rasam powder recipe with us. ;-) Rasam, Saaru, Chaaru, Saathumudhu... different names, one dish. A tamarind based south Indian soup flavored with various spices to give it a different taste every time. Rasam is an indispensable part of a South Indian feast.

Friday, 8 June 2012

Noodle Burrito | Noodle Frankie

Noodle Frankie is extremely popular in my college. A thin tortilla stuffed with red hot noodles and other spices and rolled like a Burrito makes it an absolute delight to munch on during breaks. Bit by the nostalgia bug, (I graduated in March) I decided to recreate the same roll at home. And I believe I almost succeeded. A bit of tailoring the recipe here and there would give me the perfect homemade Noodle Burrito I've been looking for. What you see here is the perfect Noodle Frankie recipe (I hope so!).

Saturday, 28 April 2012

Instant Raw Mango Pickle | Cooking With Kin #15#

I'm here with another guest post for my CWK Series. And this time, Anjali from Spice n Sugar Tales has graced us with her delectable Raw Mango Pickle! I got acquainted with Anjali 2 months ago, when she won the Jingle All the Way event hosted on my blog. Mails were sent back and forth and before I knew it, we became good friends! :-) She agreed to do the guest post and sent me this recipe long back. Enjoy!

Saturday, 7 January 2012

Fresh Garlic Chutney

Just a quick recipe. The aroma of garlic is unmistakable! I love anything with garlic and love spicing all my dishes with this chutney. You can make this in large quantities and store in the refrigerator for upto 2 weeks.

Tuesday, 6 December 2011

Cheese Sauce

It is perhaps the most versatile sauce you will ever come across. Use it as a dip or as a spread, it yields yummilicious results! Serve it with boiled vegetables or with Pasta or in classics like Macaroni & Cheese or use it as a dip for Nachos... In short, this is the perfect condiment! :-D

Friday, 21 October 2011

Mint-Basil Pesto Sauce

2 months ago, I never knew something like this existed. And here I am today, talking about Pesto Sauce like any other Italian! ;-) I guess blogging & extensive food-searching does that to you! Why I'm making this sauce? Well you have to read my next post for that. But I can tell you that this takes just 2 minutes of your time. And it gives a wonderful flavor to the dish!
Traditionally Pesto consists of crushed garlic, basil and pine nuts, blended with Olive oil and Parmesan cheese.
Wikipedia: Because pesto is a generic term for anything that is made by pounding, there are various other pestos, some traditional, some modern. For this reason, the original (and most common) pesto is now called pesto alla genovese or pesto genovese (both forms are used in both English and Italian)
But today I also added Mint leaves to the sauce. You can  totally skip it & make an original Pesto Sauce.

Ingredients
Fresh Basil (Tulsi) Leaves - 2 cups
Garlic - 3 cloves
Pine Nuts - 2 tablespoons (I used Almonds)
Salt - To taste - 1 teaspoon
Pepper - 1 teaspoon
Olive Oil - 1/4 - 1/2 cup
Grated Cheese - 1/4 cup (preferably Parmesan. I used Mozzarella)
Traditional Method (The traditional method of making pesto is with a mortar and pestle.)
STEP 1: Wash the leave well. Remove the stems. Dry leaves with a cloth.
STEP 2: Peel & Chop the Garlic.
STEP 3: Grate the cheese. 
STEP 4: Add the garlic to the mortar & crush lightly.
STEP 5: Add basil, Salt, Pepper, Pine Nuts / Almonds. Grind them continuously to get a paste.
STEP 6: Pound in the cheese.
STEP 7: When you have a crushed paste, slowly whisk in the oil little by little to get the desired consistency.
Your Italian Pesto is ready!

Alternatively, In a blender / Food processor / Grinder / Mixer -
- Add the garlic & mince.
 - Next, add the basil leaves, pine nuts, and a dash of salt and pepper to the bowl of the processor.
- While the processor is running, slowly drizzle in olive oil through the feed tube until all the ingredients are pureed 
- You may need to stop the processor at this point and scrape down the sides with a rubber spatula to get every mixed together.
- Now add Parmesan cheese and mix it into the rest of the mixture. 
- If the pesto is too thick, add a tablespoon of water
Cover and refrigerate until you are ready to use it. This should keep for 2 - 3 days in the fridge but freezes well if you want to keep it longer.

Saturday, 1 October 2011

How to make Cream Cheese


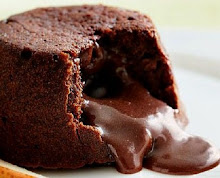
I really envy people living in the US. Most of the cake-decorating items, types of cheese etc are available everywhere and they aren't as expensive as they are in India! The other day I went looking for Cream Cheese to make my very first Cheesecake. After looking for it in almost 20 shops, I finally came across tiny packets (50 ml) priced at 125 RUPEES!! Imagine my horror! I certainly needed at least 5 packets of the cheese to make one tiny cheesecake. I decided that if I had to spend 625 bucks on one ingredient, I was better off not eating it...

I read about it in Wiki and also looked for a closely related recipe. That is when I came across this simple recipe to make cream cheese. It is very similar to cottage cheese (paneer) making. But it is soft & mild-tasting and proved to be excellent in my cheesecake!

Let's make cream cheese.....

Ingredients (makes about 100-150 ml cream cheese)
Milk - 500 ml (1/2 liter)
*Citric Acid Crystals - 1/2 teaspoon
*1/4 cup warm water
If you don't have citric acid crystals, just use 1/2 tablespoon of lemon juice. (If using lemon juice, you don't require warm water)

Method
Bring the milk to boil in a thick bottomed pan
Simultaneously, dissolve the citric acid in warm water. If using fresh lemon juice, skip this step
 When the milk comes to a boil, add the lemon juice or the citric acid-water into the milk and gently stir.
Allow it to stand for 5-7 minutes or until milk curdles on its own. Look at the picture -
Take a muslin cloth or any thin cloth & cover a vessel top with it
Very slowly, start pouring the curdled milk on the cloth. You can see the milk particles separate & the whey (the water-y substance) filter out.
After pouring the entire content, this is how the strained mixture will look on your thin cloth-
Now, if the strained whey (the water-y substance) is milky, boil it again & strain it to get some more milk particles. If not, skip  this step.
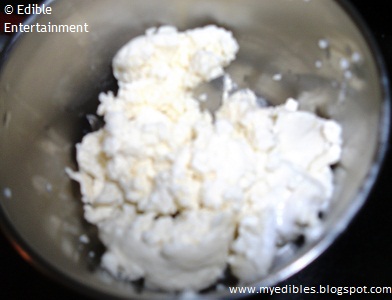
 Gently close your milk particles with the cloth & squeeze the water. Then hang it from somewhere for around 10 minutes. It will look like this after the whey has been strained completely -
Now add this to a blender / food processor / mixer and also add 2-3 drops of the whey (the water-y remains) to the blender (to get a smooth cheese) and blend the drained milk solids for 2 minutes or until you get a thick & creamy cheese.
Use as and when required! Store it in the refrigerator. Ideally, use it within a day. This is also yummy as a dip for vegetable dumplings, kebabs, patties etc...

LOW-FAT VERSION
To get a fat free version of this cream cheese which can be relished without guilt by everyone, including people having diabetes or cholesterol, use LOW FAT or SKIMMED MILK instead of the regular milk.

Now you have no excuse to make a Cheesecake, do you?! :-D

Saturday, 16 July 2011

Roasted Chili Guacamole

Don't EVER have generous helpings of guacamole when you make it this way! Very spicy! The original recipe called for avocados. In India, they are rare & even if I do find them, they are ridiculously expensive. So, I decided to alter the recipe & make it my own! ;-) Check it out --
Ingredients

  • 2-4 green chiles such as Anaheim, Hatch, or Poblano (roasted, see instructions below)
  • 3 large or 4 medium, ripe avocado ( I used half zucchini/cucumber ☺)
  • 1/2 white onion, peeled and finley chopped
  • 1 chile, finely chopped
  • 2 tablespoons lemon juice
  • 1/2 cup fresh cilantro, finely chopped
  • 1 teaspoon salt
Method
1. Roast the green chilies and remove the skin. 
    - Dry roast it for 5-10 minutes & immediately put in in a plastic box/cover. 
    - After 10 minutes, you can easily peel of the cover
skip the step if you aren't able to do it. but dry roast the chilies.
 
2. In a blender, put the chilies, green chili, salt, avocado/cucumber, onion, coriander/cilantro & blen it to a coarse mixture.


3. Adjust the salt & add lime juice.


*** NOTE -  This is not the authentic way of making Guacamole. I got this recipe from here & I just changed it to suit my capacity. If you want to know how to make real authentic guacamole, then stop by here

Tomatillo Salsa

Okay, so we are now going to learn how to make Tomato Salsa. (if you wanna learn the Salsa dance, you can buy the Learn to Salsa from Amazon. I love it! Very simple & clear steps on how to Salsa dance! ☺)
And now, back to our Mexican cooking. Tomatillo Sauce, obviously is a tomato based sauce. Takes 5 minutes to make. And a superb spread too!

Ingredients
Tomato - Around 3 medium sized
Cloves of garlic - 3-4
1 or 2 chilies, seeds removed, chopped
1/4 medium yellow onion (if not, regular onion)
1/4 cup of chopped coriander/parsley
1/4 teaspoon ground cumin
1 tablespoon of lime juice
Olive Oil - 1 tsp.

Salt to taste


Method
1. Add the tomatoes, garlic, chiles, onion, cilantro, cumin and lime juice to a blender. Blend until it has a smooth consistency.

2. In a deep pan on medium-low heat, heat up the oil. Pour the blended salsa into the pan and cook while occasionally stirring for 10 minutes. Taste the salsa and add salt and adjust the seasonings. 

Sunday, 10 July 2011

White Sauce | Béchamel Sauce


This is the mother o all sauces! It is used in many dishes like Pasta. Now, there are a variety of brands available in the market. (like the one on the Ad on your left) But I've got an easy way of preparing it at home sweet home. And the way it blends with Pasta.... God save me! it is absolutely delicious! I'm running out of adjectives to use! :-D I guess that is what happens when you start appreciating food & trying out new dishes! 
You can make & store this sauce for a long time in the refrigerator. Although, when freshly consumed, it tastes heavenly! If you use onions in the sauce, it is better to consumed it that day itself! ☺


Ingredients ~
All purpose flour - 1 tablespoon OR  Cornflour - 1 teaspoon
Butter - 2 tablespoons
Garlic Cloves - 2-3 crushed 
Milk - 150-200 ml 
Salt - 3/4 teaspoon
Pepper Powder - 1 teaspoon
Grated Cheese - 2 tablespoons
Chilli Flakes - 1 tablespoon (optional)
Oregano Powder - 1 tablespoon (optional)
Onion - 3 tablespoons (finely chopped - optional)

Method ~
1. Melt the butter on low heat. Sauté the garlic for 1 minute (if you want, the onions too)
2. Stir in the flour & sauté for 1 minute. Don't let it burn.
3. Add milk & stir continuously to avoid lumps.
4. Once it thickens, add the salt, pepper, chilli flakes, oregano & grated cheese & mix well.
 5. Keep aside for further use.

Saturday, 2 July 2011

Pizza Spread

Hey y'all!!! J

I'm back with another tried & tested recipe for an aMMMMMazing spread! J You can use this on Pizzas, Calzones, Breads, with Idli, Dosa etc. It is veryyyy easy to make! I made this in 10 minutes! And it tastes good! :-D 
Of course, you don't really HAVE to make the spread at home. You could buy Pastorelli's Pizza Sauce for just $ 2.79! (Why, yes! I am advertising! J)

Making it at home is always good for 2 reasons:
1. You consume it fresh & don't add preservatives.
2. Since you make it, you have personal feelings attached to it which makes it even more delicious! Trust me, you wouldn't understand it unless you actually start cooking!


To make the sauce, you'll need-
Onions (finely chopped) - 2 medium sized
Tomato (finely chopped) - 3-4 medium sized
Green chillis (finely chopped) - 3-4
Salt - to taste (about 2 teaspoons)
Red Chilli Powder - 2 teaspoons
Pepper Powder - 2 teaspoons
Garlic - 6 cloves (cut into small pieces)
Oregano powder - 1 tablespoon (optional)
Vegetable Oil - 2 teaspoons

Method
1. Heat the oil in a pan. Add the green chilli, garlic, salt & onions & sauté for 1-2 minutes till the onions turn translucent.
2. Now add the oregano, red chilli powder, pepper powder & sauté for 30 seconds
 
 3. Add the tomato & sauté in high flame for about 5 minutes until the whole mixture is reduced to half due to the heat. Put the whole mixture in a blender/mixer & grind to a fine paste.
 
 4. Being an Indian, I like my spread to be very well cooked! So, I again poured the mixture onto the pan & let it cook for about 2 minutes. My brother loves ketchup. So I also added around 1 tablespoon full of ketchup to the mixture.
 
 There you go. Spicy, tasty Pizza spread ready! You can use this for a variety of other stuff too! ENJOY!   
Related Posts Plugin for WordPress, Blogger...