Ads 468x60px

Showing posts with label Cakes. Show all posts

Sunday, 1 July 2012

Moist Carrot Cake

Visit www.foodomania.com for the recipe & step by step pictures.
Link to this recipe - http://foodomania.com/moist-carrot-cake/

Saturday, 9 June 2012

Chocolate Cupcakes

Use this recipe for baking a cake or a batch of cupcakes. I swear they would turn out soft and spongy. This has, by far been THE most successful experiments with ingredients I've ever had. This recipe exemplifies the saying 'Simplicity is profound'. So simple and readily available are the ingredients that go into the making of these cupcakes that you'll want to bake them everyday!

Thursday, 10 May 2012

Strawberry Cake | Kitchen Blooper No. 1

I don't even know why I'm sharing this recipe. It was my first failed cake. But once in a while, its okay to show off your flopped attempts too. :-) I did figure out why the cake tanked. So this is not a completely useless post either. :-)

Sunday, 8 April 2012

Add that 'zing' to your Brownies.. :)

We all agree that brownies are sinfully delicious, right? Forget brownies for a sec, we are constantly looking for ways to spruce up a recipe. And here are few ways you can make your brownies better.

Sunday, 25 December 2011

Eggless Golden Yellow Cake > *Christmas 2011*

Merry Christmas Y'all! :-D
10 years ago, my neighbor, who also happens to be my best friend Jennybum (oops, Jennifer) and I were deciding what to ask Santa Claus. We were in 3rd grade then. We made big plans, kept milk & biscuits for Santa & wrote down our long list of gifts, seeing which, if Santa had been real, would surely have had a heart attack! :-D It was Selvi Aunty, Jenny's mom who was our *secret Santa*. We settled for pencil boxes & crayons. :-) Selvi aunty's yellow cake, strawberry swirl cake, cookies and so many more goodies made all my childhood Christmases.

Saturday, 5 November 2011

Monday, 24 October 2011

100th Post:- 3 Tier Whimsical Birthday Cake

I cannot believe that Edible Entertainment is 100 posts old already! When I started this blog on a Saturday night, I did not for one second know that this would turn into a passion! I read Divya Kudua’s blog Easycooking & just made a decision on an impulse to start a Food Blog. Then, Manali Shah’s valuable opinion made me realize how important it is to have a good click of your dish. Along with cooking, my dormant interest in photography has emerged too. And now, I try my best to make my food on the plate look good, get a best shot of it from the best possible angle, editing it and so on….

Anyway, I wanted to celebrate the 100th post of my blog with a Cake. (I had decided that since my first recipe, a Black Forest Cake. Only, I didn’t know if I would survive until the 100th post! :P) It also happened to be my brother’s 15th birthday! [I started cooking because I realized my interest in food, no doubt. But also, to get the “Best Sister” award from my foodie brother!  ;-)] So, I clubbed the two events to make a 3 tier Whimsical CAKE. ‘Whimsical’ because this one has no rules, no perfection, nothing! ;-) What you want; you do. Any cake any icing! (Oh No Sir, you do not use tomato ketchup as icing on the cake! :-P

To make the cake, you’ll need
3 Chocolate Cakes of various sizes. (I made all in the Microwave)
Chocolate Buttercream Frosting or Ganache or Fudge
Kit Kat Fingers
Colorful Candies (like M&M, Gems etc)
Chocolate Sprinkles / Vermicelli

Method
1. Take the largest of the cake & apply Whipped Cream all over. 
2. Sprinkle some chocolate sprinkles, scrolls, etc.
3. Place the second tier cake on it & apply chocolate buttercream or ganache.

4. Place the 3rd layer of the cake on top & apply whipped cream on it. 
5. Stick Kit Kat Finger on the side of the cake to make it look like a fence. If this is not possible, just poke each Kit Kat gently on the lower cake layer.
6. Decorate the second layer with Gems or M&M.
7. Use any Chocolate Decoration of you choice on the third. I melted some chocolate & make a supposedly joker face.
8. Keep it chilled until you have to cut it. 
* Make sure your whipped cream is chilled. Mine started melting very soon. I had to freeze it every 20 minutes while decorating.


Happy Birthday Satya! (It also happens to be another landmark. 80 followers via Google Friend Connect! )
Yes, I know the cake looks comical. And that was the intention - really. You could of course do it neatly.
========================================================
Will be announcing an event shortly. Stay tuned.

Thursday, 20 October 2011

Microwave Chocolate Cake

Can it get easier than this? :-)

Recipe -
(source: Kailas Kitchen, my instinct! ☺)

Ingredients -
All purpose (refined) flour/ Maida - 125 grams (1 cup)
Powdered / Confectioners' Sugar - 1 cup (or as per taste)
Curd - 2 tablespoons
Milk - 1/2 cup / as per requirement
Melted Butter - 3 tablespoons
Cocoa Powder - 1-2 tablespoons
Baking Powder - 1/2 teaspoon
Baking / Cooking Soda - soda-bicarb - 1/2 teaspoon

Method -
1: Sieve together the flour, sugar, cocoa powder & baking powder.
* Sieving the flour mixture 2-3 times gives a good texture to the final cake.
2. Mix together soda-bi-carb / baking soda & curd well & keep aside.
3. Heat 1/4 cup water. Combine the butter and ¼ cup of hot water in another bowl and whisk well.
4. Add the flour mix & blend well.

5. Add the curd-baking soda mix & blend again.
6. Add Vanilla essence & beat well to get rid of lumps.
7. Make a smooth batter of pouring consistency. If the batter is too thick, add 2-3 tablespoons of Milk.
8. Grease a microwave safe dish & line it with butter paper.
9. Pour the batter into the bowl

10. Microwave on high for 5 minutes. Let it rest in the microwave for 1 minute.
11. Let it cool. (10 minutes) Invert on a plate & pull out the butter paper.
Your soft, spongy, chocolaty cake is rrrreeaaddyy!! ;-)


Saturday, 1 October 2011

Cookies and Cream Cheesecake (No-Bake, Eggless)

I am a huge fan of the TV show - FRIENDS (well, who isn't?!) While watching an episode (The One with All the Cheesecake) I came across Cheesecake for the very first time. And so beautiful it looked that I was on a mission to taste a piece of Cheesecake. And when I did taste it, it was horrible! I thought, "If Rachel & Chandler love it so much, it can't be horrible!". :P And thus began my quest to make a good cheesecake! And I can proudly say that I ate an amazing cheesecake, not from Café Basilico Bistro & Deli or Barista but at HOME!!!
Here is my very own Cheesecake -
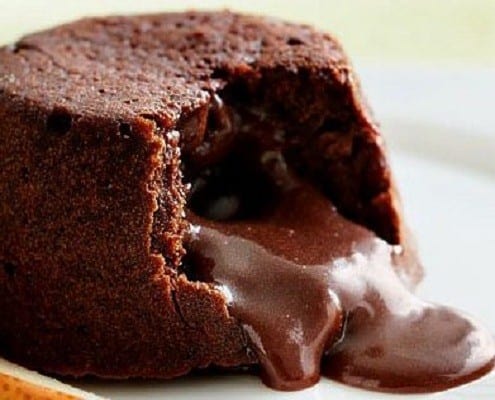
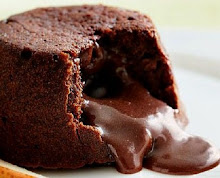
It smelled so good that I cut into it early. Hence it didn't set fully! Darn! :-D Well, it tasted heavenly though! I sprinkled some chocolate vermicelli on top and had it. Oooooo Yummm! This cheesecake is very very dear to me!! I made every single thing including the Crust & the cream cheese from scratch. And even though it doesn't look so good, it will always be my favorite cheesecake in the world!

Ingredients - (makes 6-8 slices)
For the crust -
Chocolate Biscuits. (I used 100 grams Hide n Seek)
Butter - 1 tablespoon, melted

For the Filling -
Cream Cheese - 150 ml (either store bought or made at home or an alternative)
Heavy cream - 50-80 ml
5-7 chocolate cream biscuits (example: Oreo, Bourbon Biscuits, Delta Cream etc)
Vanilla Extract / Essence - 1 teaspoon
Powdered Sugar - 1/2 cup (adjust according to taste later)
Agar Agar // Gelatine - 1 teaspoon (chopped, if flaky)
Boiling Water - 1 tablespoon

Method -
Crust/base -
1. Crush biscuits in food processor or with the end of a rolling pin.
2. Add melted butter and stir to combine. Add enough butter to ensure that when you pick up some biscuit crumbs, they should be able to hold together (in pic 2 below)
3. Press into base of 24cm springform cake tin. I didn't have it so I used a very low bottomed plate.
4. Refrigerate for minimum 30 minutes.

Filling -
1. Sprinkle gelatine/agar agar over boiling water and whisk with a fork until it is completely dissolved. Allow to cool slightly.
Want to know more about cooking with gelatine / agar-agar? Click HERE.

2. In a mixing bowl, add the cream cheese & vanilla essence.
3. Add the castor/confectioner/powdered sugar.
4. With a manual or electric whisk, beat the mixture until completely smooth.
5. Then, add the heavy cream.
6. Again beat the mixture until smooth & looks fluffy.
7. If you want, add melted white chocolate in this step & mix well. I skipped. Just added a little bit of milk chocolate that I had.
8. Stir in the gelatine / agar agar liquid into the mixture & beat well for 1 minute. 
9. Finally, break the cream biscuits into small pieces & stir into the mixture.
To combine -
1. Take the crust out of the refrigerator.
2. Pour the entire filling onto the crust & using a flat knife or a spatula, spread it evenly on the entire plate.
3. Refrigerate overnight. Its ready!! ☺

Serve with drizzled melted chocolate, chocolate shavings, sprinkles etc!
~~~~~~~~~~~~~~~~~~~~~~~~~~~~~~~~~~~~~~~~~~~~~~~~~~~~~
Also, I'm celebrating the milestone of 50 foodie friends / followers via Google Connect with this cake!
~~~~~~~~~~~~~~~~~~~~~~~~~~~~~~~~~~~~~~~~~~~~~~~~~
As you can see in the picture, I didn't cut the pieces perfectly. Also, I took it out within 5 hours. If I would have given it a couple more hours, it would have been perfect. So remember to refrigerate it for 6-8 hours at least.
Related Posts Plugin for WordPress, Blogger...