Ads 468x60px

Sunday, 10 July 2011

Onion Pakoda/Dumpling

Finally I have something to post about! :-D I made quite a few dishes today! One of them being Onion Dumplings. Or Pakoda (Puh-koh-daa) as it is called in India. Yes, it is another deep fried goodie! But honestly, what harm can a tiny dumpling eaten in moderation once a week do? The answer is: Nothing! For health freaks who might read my blog, I'd like to tell you that I've got a lot of healthy recipes in mind. They'll be up on my blog very soon! So please don't freak out & run away! :-D
So, back to our Pakoda. You can make a Pakoda using different ingredients like Onions, Eggplant, Spinach, Raw Banana, Potato etc
Ingredients:-
Onion - 2 medium (sliced length-wise)
Rice flour -  50-70 grams
Green Chilli - 3-4 (finely chopped)
Ginger Paste - 1 teaspoon
Red Chili Powder - 2 teaspoons
Vegetable Oil - 4 teaspoons for the dough + Oil for deep frying
Curry Leaves - 1 tablespoon (finely chopped)
Salt - 1-2 teaspoons (or to taste)
Baking Soda - 1/2 teaspoon (optional) - makes it crisp

Method:-
1. Slice the onion length wise. Add 1 teaspoon salt, green chili, curry leaves to it & mix it.
2. In a mixing bowl, add the Gram flour, rice flour, oil, baking soda, ginger paste & mix it well.
3. Add the onion mixture to the flour & mix it well. It shouldn't be a proper round shaped dough. The onion leaves water hence there should be no need of more water. Yet, if need be, just add water drop by drop to make sure it isn't more than the required amount. The dough should look like this -
4. Heat the oil in a pan. Just tear away the onions & slowly drop them in the oil. They need not be single onions. Just small bunches. They can be of any shape. You don't need to make them into any balls. :-D
5. Fry them well on both sides. IF you like really crispy ones, fry them a little longer on low flame. Make sure you don't burn the onions. Serve them with any dipping of your choice! (ketchup, Mint-Coriander chutney etc.)
 

Saturday, 9 July 2011

Basics of Baking

Good Day everybody!

I know its been a while since I posted any recipe here. What to do? I've been busy with work & college. Haven't had a chance to cook anything yet. So I decided to talk about baking. Everyone loves cakes. And if we make it, the love just multiplies looking at the perfectly baled cake!  I'm not a great expert at baking. I'm just 3 cakes & 2 breads old. However, I've been successful in all my baking experiments (*touch wood* ) I thought I could share some tips about baking with you all. Who knows when it might come in handy, right? :-D


1. ALWAYS make sure you have a good baking pan. I found this inexpensive bakeware on Amazon. (on your left) It has all the shapes and sizes you'll need! 

2. Keep clean mixing bowls & a whipper with you. I have a manual whisk & an electric blender with me which works well for me. But having an electronic whipper can be really helpful. And it costs less than 20$. It is a one-time investment. Think of all the wonder creams you'll whip or the delicious cakes you'll whisk.

3. Measuring spoons & cups - When the recipe says 1 teaspoon baking powder, do not just add any small spoon. AT least not in the beginning. Progressive GT-3520 International 19-Piece Measuring Cup and Spoon Set is one of the many brands of measuring spoons/cups available in the market. Once you become an expert at baking, you can trust your instincts.

4. Ingredients - Get all the ingredients ready before you start preparing for the bake. It is best to be well prepared before you start the process. When I made my FIRST CAKE, I had all the required ingredients lined up in different cups. Hence, it was really easy to mix all of them according to the recipe.

5. Make sure you lay down some old newspapers on your kitchen counter. In this way, even if you spill any mixture, it'll be very easy to clean. I, in fact lay newspapers for all my dishes coz I've still not perfected the art of neat-cooking

6. Always PREHEAT the oven to the said temperature at least 20 minutes before you put in the mix. I switch on the oven when I start assembling ingredients for the cake/bread mixture.

7. You have to grease your pan well and line it with parchment paper in order to avoid the cake from sticking onto the cake pan. To grease a pan you have to -
                      - Apply softened butter all over the pan.
                      - Sprinkle some all purpose flour all over the tin (about 1 tablespoon)
                      - Shake the cake pan slightly so that the excess flour would fall down.

8. Once your dish is cooked, immediately wash the pans/vessels in which you prepared the cake/bread. If you procrastinate, it becomes difficult to wash the utensils. However, if you DO have to delay the washing, I suggest you soak them in water until you wash them.

And last but not the least, always remember the motto - Yummy yummy yummy, I've got love in my tummy!  ☺ ☺ ☺

Sunday, 3 July 2011

Calzone

Hello Everybody!!!!!!! ☺ ☺ ☺

I hope you all are liking the recipes I've been posting so far! ever since I started this blog, I just look forward to the weekend to try out new recipes! And my family loves my enthusiasm because they get to eat dishes they've never heard of!

I bravely ventured into Yeast-baking once again. Even though my first experiment, the Garlic Pull Apart Rolls was successful, I was a little nervous about the Calzone. When you use yeast, the dough tends to stretch a bit. And with all the yummy veggies & cheese & sauce I was going to stuff inside, I wasn't sure if the dough would tear or not. If I had a Calzone maker, I wouldn't have been so tensed! I've written it down on my wishlist. Check out to your left for a cheap mould.

Let us make Calzones...


Ingredients
for the dough - 
All purpose flour / Maida - 250 grams
Wheat flour - 50 grams (optional. you skip this & use Maida flour itself)
Dry Yeast - 2 & 1/2 teaspoons
Sugar - 1 teaspoon
Salt - to taste (1.5 teaspoon)
Olive Oil - 1 tablespoon (if not available, use any other cooking oil)

for the filling - 
*the following veggies are what I used for making the Calzone. You can use any vegetable of your choice. If you have left-overs, use that. You can even stuff it with meat, chicken etc. But we stick to vegetarian! *
Onion - 2 medium sized (finely chopped)
Capsicum - 1 large (remove seeds; chop finely)
Tomato - 2 large (finely chopped)
Carrot - 1 carrot (finely grated)
Baby Corn - 2 small (cut into small flowers)
Beans - very few (I used around 3 beans because we aren't big fans of beans)
Green Chilli - 3- 4 (finely chopped)

for garnish - 
Pizza Cheese (Mozzarella) - grated
Dry Oregano Powder - readily available in the market
Red Chilli Flakes - put 5- 6 dried red chillies into a blender/mixer along with some salt & make it into a powder. (also available in the market readily)
Pepper Powder (optional)
Salt - to taste


Method
for the dough -
1. Take a cup of warm water & dissolve the sugar in it. Now add the yeast & stir for a minute or 2. Let it rest for 5 minutes
2. In a mixing bowl, add the flour, salt & oil & mix it thoroughly with a fork. Slowly add the Yeast water to the flour & keep mixing it. With your hands, knead the flour for about 10 minutes to make it into a smooth dough.
 
 3. Cover the dough with a damp cloth & let it rest for 45minutes- 1 hour. You'll notice that the yeast works its magic! The dough rises to almost double its initial size! ☺
 
for the filling-
You can do 2 things -
* Either make the Calzone & fill it with the veggies one by one; OR
* Lightly stir fry all the veggies & mix with some Pizza Sauce & then stuff it in the Calzone
To make the Calzone-
1. Preheat the oven to 200 degree C
2. Divide the pizza dough into 4 equal portions. Keep aside under a wet cloth.
3. Roll out each portion of the dough into a 6 inch diameter circle. (or any size you want)

4. Apply the Pizza Sauce on one side of the dough & put one portion of the filling on each circle. Top it with oregano, chilli flakes & grated cheese
5. Fold each circle to form a semicircle.
6. Seal the ends using a little water and press the edges firmly with the help of a fork.
7. Grease a baking pan & place the Calzone on it. 
8. Apply ample butter all over the Calzone.
9. Bake at 200 degree C for 20 minutes or until the toothpick insert comes out clean. Cut them into slices.
 
10. Apply more butter on top & serve hot with ketchup! ☺ ☻

Verdict: I still have to perfect my yeast baking. Taste-wise, it was really good. Even the bread came out really soft. But the shape came out just okay. One mistake that I made was to fill it with too much veggies. While I tried to make it into a semi-circle, some places started tearing. So avoid dumping to much in. Just fill the veggies in the center of the dough. If you use egg to grease the Calzone, t would come out brown. I used butter. Hence, the outcome was a white Calzone. I don't know when I'll be making the next Calzone. But next time, I'm gonna focus on making them look great! ☻ 

Saturday, 2 July 2011

Pizza Spread

Hey y'all!!! J

I'm back with another tried & tested recipe for an aMMMMMazing spread! J You can use this on Pizzas, Calzones, Breads, with Idli, Dosa etc. It is veryyyy easy to make! I made this in 10 minutes! And it tastes good! :-D 
Of course, you don't really HAVE to make the spread at home. You could buy Pastorelli's Pizza Sauce for just $ 2.79! (Why, yes! I am advertising! J)

Making it at home is always good for 2 reasons:
1. You consume it fresh & don't add preservatives.
2. Since you make it, you have personal feelings attached to it which makes it even more delicious! Trust me, you wouldn't understand it unless you actually start cooking!


To make the sauce, you'll need-
Onions (finely chopped) - 2 medium sized
Tomato (finely chopped) - 3-4 medium sized
Green chillis (finely chopped) - 3-4
Salt - to taste (about 2 teaspoons)
Red Chilli Powder - 2 teaspoons
Pepper Powder - 2 teaspoons
Garlic - 6 cloves (cut into small pieces)
Oregano powder - 1 tablespoon (optional)
Vegetable Oil - 2 teaspoons

Method
1. Heat the oil in a pan. Add the green chilli, garlic, salt & onions & sauté for 1-2 minutes till the onions turn translucent.
2. Now add the oregano, red chilli powder, pepper powder & sauté for 30 seconds
 
 3. Add the tomato & sauté in high flame for about 5 minutes until the whole mixture is reduced to half due to the heat. Put the whole mixture in a blender/mixer & grind to a fine paste.
 
 4. Being an Indian, I like my spread to be very well cooked! So, I again poured the mixture onto the pan & let it cook for about 2 minutes. My brother loves ketchup. So I also added around 1 tablespoon full of ketchup to the mixture.
 
 There you go. Spicy, tasty Pizza spread ready! You can use this for a variety of other stuff too! ENJOY!   

Samosa

(to be read as S-uh-moh-saa)
Check out the Ad to your left. Really yummy, ready-made Samosa! :-D

It is a stuffed savory which is very popular in India. But the Samosa you buy from outside contains Daaldaa or hydrogenated vegetable oil which is not very good for health. Plus, Samosas are deeply fried in Oil, hence not very healthy. But nevertheless, they are extremely delicious. So what do you do? Not eat them? Naah! Where's the fun in that? The best thing to do would be to make them at home. It is a long process & hence, you'll end up making it just once or twice a month. :-)


This is the very first time I tried to make Samosas at home. While they tasted heavenly, the shape of the Samosas were really comical! They are supposed to be conical. They should ideally look like these. But you'll see how mine turned out! :-P


Ingredients
For the dough
All purpose flour / Maida - 150 grams
Wheat flour - 20 grams (optional)
Vegetable Oil - 3 teaspoons
Salt - 1/2 teaspoon
Baking Soda - 1/2 teaspoon (optional)
Warm water - 3 tablespoons
Water - to knead (about 50 - 100 ml or more)


For the filling
Boiled & mashed potatoes - 3-4 medium sized
Finely chopped onions - 1 medium (optional)
Green Chillies - 1-2 (finely chopped)
Cumin seeds - 1 teaspoon
Garlic - 2 cloves (grated)
Ginger - 1 teaspoon (crushed)
Parsley/ Coriander leaves - 1 tablespoon (finely chopped)
Turmeric / Haldi powder - 1 teaspoon
Red Chilli Powder - 2 teaspoons
Garam Masala Powder - 1 teaspoon * (reaadily available in market)
Dry Mango Powder/ Aamchur - 1 teaspoon (if not available - use Lime juice 1 teaspoon)
SALT - to taste (around 1/2 tablespoon)


Method
To make the dough
1. In a mixing bowl, put the flour, salt, oil & warm water & mix it with a fork until crumbs are formed. You could add baking soda if you want too. This makes the Samosas crispy! I just put the wheat flour for fun! Wanted to see what difference it makes. But in authentic samosas, wheat flour isn't added.
 
2. Use your hand to knead the dough. Slowly add the water & make it into a smooth dough. Don't add excess water as it would become difficult to make the samosas. Knead for about 10 minutes & cover it with a damp cloth for 20 minutes at least.
 

To make the Filling
1. In a pan, add the oil, cumin seeds, green chilli, ginger-garlic, turmeric powder, red chilli powder, garam masala, salt, dry mango powder (or lime juice) & sauté for 1 minute. 
2. You can add the chopped onions now & sauté for a minute. I skipped because mom & dad couldn't eat onion-garlic that day.
3. Add the mashed potatoes & coriander leaves & mix well.
4. Let the mixture cook on medium flame for about 3-4 minutes.
5. Remove & let it cool.


To make the Samosa - finally! 
1. Make little balls of dough & roll them into round disks. Cut the disk in half to get 2 semi-circles. Use ample flour to avoid the dough from sticking.
 
 2. Take one of the semicircle in your hand. Fold one end upto half. Then the other end. Using your hand, gently stretch & press the dough to make it into a cone. 
3. Fill the cone with the filling you prepared & press the ends of the cone in to fully cover the bottom
AN EASY ALTERNATIVE:- If you cannot make the cone, then here's the easy way - 
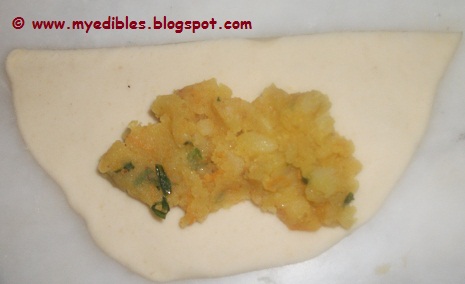
 - Keep the semicircle dough on a flat surface & apply some filling in the middle.
 - Close the semicircle from both end one by one. Make it into a cone. Gently press all ends so that it is completely closed.
 

4. Once you prepare all the samosas, deep fry in the preheated oil for at least 5 minutes or until the Samosas turn golden brown. It is important to keep them at medium or low flame & fry for a longer time so that the samosas turn crispy & yet not burn or become black.

Serve hot with Ketchup or the Mint-Coriander chutney! :-)

Related Posts Plugin for WordPress, Blogger...