 |
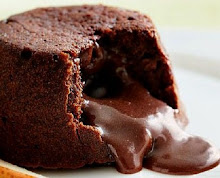
Visit www.foodomania.com for the recipe & step by step pictures.
Link to this recipe - http://foodomania.com/chocolate-lava-cake/
|
Monday, 31 October 2011
Eggless Molten Lava Cake (in a Microwave)
Sunday, 30 October 2011
Announcing Healthy Cooking Challenge : Healthy Lunch
For a lot of people, reading *Healthy* & *Tasty* in one sentence is bliss. :-D The constant yo-yoing around with healthy and then junk and then healthy and again junk food is something which (most of us) are familiar with. And since including fitness to my blog, (hoping fervently that it would rub of on me too) I have been on the lookout for anything that is Healthy+Tasty. Coz lets face it - if I had to live off on Caesar Salad & Fruit Juices for the rest of my life to remain fit, I'd DIE!

And when I came across Smita's event: The Healthy Cooking Challenge, and that she was looking for people to guest host the November challenge, I jumped in! :-D And to my delight, she agreed. So here I am, guest hosting my first event. So our theme for November is Healthy Lunch. Lunch - short for luncheon is a mid-day meal. A fresh, wholesome meal eaten between noon & 2 pm helps us to curb temptation that sets in later during the evenings. Put on your thinking caps & come up with unique lunch ideas that are basically healthy. It can be an elaborate Indian meal or a light Western Meal. As long as it is in line with our theme, you're good to go.
Some rules you need to keep in mind are -
1. Post your Recipes between 1st November - 31st November
2. Old entries re-posted are allowed.
3. Kindly stick to Vegetarian recipes. (Eggs may be used, though not preferable)
4. Please link back to this event-announcement page as well as Smita's page.
5. Usage of logo, though appreciated, is not mandatory.
6. Multiple entries accepted.
7. The roundup of the event will be posted on December 1st, 2011.
8. All eligible entries - please LINK YOUR RECIPES to this page. (with Simply Linked - post your Recipe name & URL here)
9. Non-bloggers & those who are not able to link their recipes here can shoot me an email at - chefkavi1990@gmail.com [chefkavi1990(at)gmail(dot)com] with the subject line as - HCC and with the following information -
- Your Name -
- Blog's Name -
- Blog URL
- Recipe Name -
- Recipe URL -
- Attach a picture
- In case you are a Non-Blogger, send me the recipe too if you want. I'll post it on my blog

Here are some Lunch ideas to get you started -
> Bean Burritos
> Brown Rice & Lentils
>Roti / Tortilla
> Sandwich
> Soup & Salad
> Porridge etc
* I'd be lying if I say I'm not nervous about hosting this event, coz I totally am! This is my very first event and I'm really looking forward to a lot of entries. So please take a moment and link your recipes to this page. Lunch is something we all eat everyday and so, you won't be doing anything out of the way, right? Just cook, click pics, post & link! (Please?! :-) :-D)
I'm even thinking of announcing Virtual Award Winners at the end of this event. :-D
HCC : Healthy Lunch
(Between 1st November - 30th November 2011)
Wednesday, 26 October 2011
Pearl Tapioca / Sago Pudding | Jevvarisi Payasam | Sabudana Kheer
A very Happy Diwali to all! ☺ ☻
India's much awaited festival is finally here - The Festival of Lights. And this year, since I've been such an active member of the kitchen, I took up the responsibility of making a Sweet (Prasadham). For every festival, we make one sweet dish as offering to the Lord. And this time, I decided to make the usual - Sago Pudding (Sabudana Kheer / Jevvarisi Payasam). My mother makes this on almost all festivals and I decided this would be the perfect opportunity to learn her secret recipe! :-D And I couldn't believe something so tasty could be that easy! But ~ ~ it is! :-)

So, Sago / Pearl Tapioca / Sabudana / Jevvarisi - the main ingredient of this pudding. You get it very easily in all Indian stores. even if you're not in India, I'm sure you can get it at any general store near your place. (click on the above links to know more)
Ingredients
Sago / Sabudana / Jevvarisi - A fist-full
Milk - 300 ml (less or more depending upon the consistency you want)
Sugar - 1/2 cup (around 50 grams: or as per taste)
Clarified Butter / Ghee - 1 tablespoon
Cashews - 6-8, broken
Cardamom | Elaichi Powder - 1 teaspoon
Kesar / Saffron / edible Orange Color - 1/2 teaspoon (optional. you can skip it & have the pudding in white color)
Method
STEP I
Soak the sago pearls in water for about half hour. This makes it easier for them to cook fast while boiling.
 STEP II
On medium heat, keep the vessel with sago pearls. Add milk to it. Let it boil until the sago pearls are soft & mash-able! :-D

 STEP III
Add the saffron leaves / orange color & mix well.
 STEP IV
Add sugar & mix well & let it boil for another 3-5 minutes.
STEP V
In another small pan, heat the Ghee / Clarified Butter.
 STEP VI
Roughly break the cashew nuts & add them to the ghee. Fry until they are light brown.
STEP VII
Add the fried cashews along with all the ghee/clarified butter & mix well.

STEP VIII
Add the Elaichi / Cardamom powder & mix.
 that's it. It is ready ~~~ And it smells & tastes so good! :-)
** If you feel the pudding is too thick, add more milk.

 This one is off to >
Radhika's Diwali Special: Sweets & Savories
Denny & Krithi's Serve It: Festival Potluck
Only Sweets & Desserts started by Pari & hosted by Gayathri
Anu's Diwali: Festival of Lights
Khushi's My Diwali My Way
Sameena's Diwali Sweet Recipes
Srav's Festival Food
Sreevalli's Cooking without Onion or Garlic

India's much awaited festival is finally here - The Festival of Lights. And this year, since I've been such an active member of the kitchen, I took up the responsibility of making a Sweet (Prasadham). For every festival, we make one sweet dish as offering to the Lord. And this time, I decided to make the usual - Sago Pudding (Sabudana Kheer / Jevvarisi Payasam). My mother makes this on almost all festivals and I decided this would be the perfect opportunity to learn her secret recipe! :-D And I couldn't believe something so tasty could be that easy! But ~ ~ it is! :-)

So, Sago / Pearl Tapioca / Sabudana / Jevvarisi - the main ingredient of this pudding. You get it very easily in all Indian stores. even if you're not in India, I'm sure you can get it at any general store near your place. (click on the above links to know more)
Ingredients
Sago / Sabudana / Jevvarisi - A fist-full
Milk - 300 ml (less or more depending upon the consistency you want)
Sugar - 1/2 cup (around 50 grams: or as per taste)
Clarified Butter / Ghee - 1 tablespoon
Cashews - 6-8, broken
Cardamom | Elaichi Powder - 1 teaspoon
Kesar / Saffron / edible Orange Color - 1/2 teaspoon (optional. you can skip it & have the pudding in white color)
Method
STEP I
Soak the sago pearls in water for about half hour. This makes it easier for them to cook fast while boiling.

On medium heat, keep the vessel with sago pearls. Add milk to it. Let it boil until the sago pearls are soft & mash-able! :-D


Add the saffron leaves / orange color & mix well.

Add sugar & mix well & let it boil for another 3-5 minutes.
STEP V


In another small pan, heat the Ghee / Clarified Butter.

Roughly break the cashew nuts & add them to the ghee. Fry until they are light brown.
STEP VII


Add the fried cashews along with all the ghee/clarified butter & mix well.

STEP VIII
Add the Elaichi / Cardamom powder & mix.

** If you feel the pudding is too thick, add more milk.
~~~~~~~~~~~~~~~~~~~~~~~~~~~~~~~~~~~~~~~~~~~~~~~
I also made this Rangoli outside our home. My mom was shocked! She's happy that I'm finally showing some interest in girly jobs! :-P

Radhika's Diwali Special: Sweets & Savories
Denny & Krithi's Serve It: Festival Potluck
Only Sweets & Desserts started by Pari & hosted by Gayathri
Anu's Diwali: Festival of Lights
Khushi's My Diwali My Way
Sameena's Diwali Sweet Recipes
Srav's Festival Food
Sreevalli's Cooking without Onion or Garlic


~~~~~~~~~~~~~~~~~~~~~~~~~~~~~~~~~~~~~~~~~~~~~~

Monday, 24 October 2011
100th Post:- 3 Tier Whimsical Birthday Cake
I cannot believe that Edible Entertainment is 100 posts old already! When I started this blog on a Saturday night, I did not for one second know that this would turn into a passion! I read Divya Kudua’s blog Easycooking & just made a decision on an impulse to start a Food Blog. Then, Manali Shah’s valuable opinion made me realize how important it is to have a good click of your dish. Along with cooking, my dormant interest in photography has emerged too. And now, I try my best to make my food on the plate look good, get a best shot of it from the best possible angle, editing it and so on….
Anyway, I wanted to celebrate the 100th post of my blog with a Cake. (I had decided that since my first recipe, a Black Forest Cake. Only, I didn’t know if I would survive until the 100th post! :P) It also happened to be my brother’s 15th birthday! [I started cooking because I realized my interest in food, no doubt. But also, to get the “Best Sister” award from my foodie brother! ;-)] So, I clubbed the two events to make a 3 tier Whimsical CAKE. ‘Whimsical’ because this one has no rules, no perfection, nothing! ;-) What you want; you do. Any cake any icing! (Oh No Sir, you do not use tomato ketchup as icing on the cake! :-P)

To make the cake, you’ll need –
3 Chocolate Cakes of various sizes. (I made all in the Microwave)
Chocolate Buttercream Frosting or Ganache or Fudge
Kit Kat Fingers
Colorful Candies (like M&M, Gems etc)
Chocolate Sprinkles / Vermicelli
Other ChocolateDecorations
Method –
1. Take the largest of the cake & apply Whipped Cream all over.

2. Sprinkle some chocolate sprinkles, scrolls, etc.

3. Place the second tier cake on it & apply chocolate buttercream or ganache.


4. Place the 3rd layer of the cake on top & apply whipped cream on it.

5. Stick Kit Kat Finger on the side of the cake to make it look like a fence. If this is not possible, just poke each Kit Kat gently on the lower cake layer.

6. Decorate the second layer with Gems or M&M.
7. Use any Chocolate Decoration of you choice on the third. I melted some chocolate & make a supposedly joker face.

8. Keep it chilled until you have to cut it.
* Make sure your whipped cream is chilled. Mine started melting very soon. I had to freeze it every 20 minutes while decorating.
Happy Birthday Satya! (It also happens to be another landmark. 80 followers via Google Friend Connect! ☻)

Yes, I know the cake looks comical. And that was the intention - really. You could of course do it neatly.

========================================================
Will be announcing an event shortly. Stay tuned. ☺
Pasta Au Gratin with Tomato & Pesto Sauce (In a Microwave)
3 days ago, when I got a mail from BBC GoodFood India inviting me to be a part of their celebration of the GoodFood day, I was mildly surprised! BBC GoodFood is launching its first international food magazine today. And to coincide with the launch, they are celebrating today as the GoodFood day. ☺ I'm a frequent visitor of the BBC website. I love their health tips, Competitions, recipes etc. This was a dream chance I was getting & I wasn't about to throw it away because of my "busy schedule".
All they asked me to do was to don my thinking cap & come up with a dish I've never tried before & host a party for my dear ones. And that is exactly what I did. However, I did have 2 problems:
> No time during the day (or even night!) to make this.
> No oven to bake the Au Gratin
So what did I do? I made the dish after everyone went to sleep. Literally after midnight! (yes Swati, I took inspiration from you!) And then, I woke up my brother & we had a blast eating it! It was one helluva party! ;-) And no matter how hazardous it is to eat stuff (especially such high-calorie ones) at night, there is always the thrill of doing the forbidden!! :P Plus, I really am planning to workout. :-D :-D
I made the Pesto sauce in the morning before leaving for work. (My mom thinks I'm going crazy! She thinks I'm a cookaholic! :D) This dish has a few steps to follow. But trust me, it really is very simple! Since I made it in the Microwave, it takes just about 8-10 minutes to cook. :) [I am rapidly forgetting my old oven & falling in love with the microwave!]

RECIPE -
Ingredients ~
Pasta shells - 300 grams - 2 cups (I used different shapes)
Onion - 1 medium - chopped (optional)
Mixed vegetables - 1 cup (optional)
Olive Oil - 1 teaspoon (or any other oil)
Pesto Sauce*
Tomato Sauce*
White Sauce*
Parmesan/ Cheddar/ Mozzarella Cheese*
Salt - to taste
Chili Flakes & Oregano
Microwave
* I haven't given any measurements for these because you can use as much as you want!
Steps:
I. Make the Pesto Sauce (or buy)
II. Make the White Sauce (or buy)
III. Make the Tomato Sauce (or buy)
IV. Make the Pasta
V. Prepare the Au Gratin dish.
V. Microwave away~~~

III. Make the Tomato Sauce - Check ✔
IV. Make the Pasta -
1. Heat water in a pan with generous amounts of salt.

2. Put the pasta in the hot water & let it boil for about 1 minute.
(don't cook completely since you are gonna keep in microwave too)

3. Filter the water & transfer the pasta to cool water.

4. Heat oil in a pan.

5. Add onions & veggies & stir fry for about 2 minutes.

6. Add salt per taste.
7. Add the Pasta & mix well.

8. Separate the Pasta into to bowls. In one, mix it with Pesto Sauce

9. In other, mix with tomato sauce / Pizza sauce (I used ketchup)

V. Preare the Au Gratin dish -
1. Take a microwave safe bowl/dish. Add some Pesto Pasta to the dish.

2. Then, drizzle white sauce all over it.

3. Add grated cheese.
4. Next put some Red (tomato sauce) Pasta on top of it.

5. White Sauce & then cheese.

6. Repeat until the dish is filled / Pasta is over.

7. Skip if you want: Add lots of cheese all over the dish. (of course, you can be health-conscious & add just a spoon-full! :P
8. Sprinkle some Oregano & Chili Flakes on top.

VI. Microwave Away -
My Microwave doesn't have any temperatures or anything. A simple heat or grill option. So what I did was -
1. Cover the dish with a plastic wrap or lid
2. Heat (for cheese to melt) for 2 minutes.
3. Grill for 5 minutes.

Your Cheesy Pasta Au Gratin is READY! :-)


Happy GoodFood Day everyone!
===========================================
===========================================
Will be announcing an event shortly. Stay tuned. ☺
Subscribe to:
Posts (Atom)