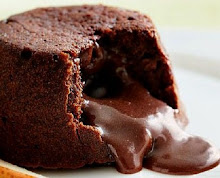
Finally... The moment is here.... :-D I'm am truly in my twenties now.. No looking back!! No residual-teen stuff! And surprisingly I was quite upbeat about turning a year older! Last year, I was at home, sighing over the fact the people have mid-life crisis, but I was having an early-life crisis! :-P But this year, with so much to look forward to, I don't feel that bad about entering the 20s... And how I entered! :-D I baked this delicious looking cake (if not perfect) Some may say its sad to bake your own birthday cake. But I don't think so! (By the way, my awesome friends surprised me with a gift basket AND a Black Forest Cake!
Wednesday, 31 August 2011
Chocolate Fudge Frosting
I've already posted about some of the common frostings you can make. While I was researching on what to make for my birthday, I came across this very simple fudge frosting!Unfortunately, I didn't click pics coz I had to bake the cake & finish it super fast. I promise pictures the next time I make it! :-)
Ingredients
- 1/2 cup butter
- 3 (1 ounce) squares cooking/modelling chocolate
- 2-3cups confectioners' / powdered sugar
- 1/2 teaspoon vanilla extract
- 3/4 cup milk
Directions
- Melt chocolate and butter in the microwave, or in the top of a double boiler. In a large bowl, combine confectioners' sugar, vanilla and 1/2 cup of the milk. Blend in the melted chocolate mixture. Add remaining milk, a little at a time, until desired consistency is achieved.
- Let stand until spreadable (frosting will thicken as it cools).
Tuesday, 30 August 2011
Chocolate Decorations
If you google for Chocolate Decorations, you'll get a million results! All exquisite and beautiful! But when you make them yourself, however silly and disproportionate they turn out, you are on cloud nine! :-) As you'll see in the photos below, my chocolate decorations were silly and random. But they did a fantastic job of beautifying my cake! (that's a mystery until August 30th!)
There's something called TEMPERING the chocolate. Its the process of heating the chocolate to a precise degree & then immediately cooling until it reaches a degree. Now, we (read: I) can get into the advanced, complicated stuff later on.. Today, its gonna be the easy way of decorating with chocolate!
You'll need -
Modelling Chocolate / Baking Chocolate / Cooking Chocolat
Parchment Paper / Butter Paper
Zip Lock Bag
Method -
1. Melt the chocolate in microwave for 1 minute or use the double boiler method to melt the chocolate.
3. Line a parchment paper on a flat surface & draw designs. You can keep a template below the parchment pare & draw accordingly. I just scribbled. :-)
4. Let it cool for 10 minutes. (Or you could place it in the freezer for 5 minutes)
5. Very VERY gently, pull away the paper from the chocolate. Store in refrigerator until use.
Your Chocolate decoration is READY! :-)
You can use these to decorate cakes, brownies, desserts like mousse, ice cream etc!
There's something called TEMPERING the chocolate. Its the process of heating the chocolate to a precise degree & then immediately cooling until it reaches a degree. Now, we (read: I) can get into the advanced, complicated stuff later on.. Today, its gonna be the easy way of decorating with chocolate!
You'll need -
Modelling Chocolate / Baking Chocolate / Cooking Chocolat
Parchment Paper / Butter Paper
Zip Lock Bag
Method -
1. Melt the chocolate in microwave for 1 minute or use the double boiler method to melt the chocolate.
2. Make sure there are no lumps. Beat the chocolate well with a spoon. Pour into a zip lock bag or any plastic bag. Depending upon how thick or thin you want your decoration to be, cut the tip off.
3. Line a parchment paper on a flat surface & draw designs. You can keep a template below the parchment pare & draw accordingly. I just scribbled. :-)
4. Let it cool for 10 minutes. (Or you could place it in the freezer for 5 minutes)
5. Very VERY gently, pull away the paper from the chocolate. Store in refrigerator until use.
Your Chocolate decoration is READY! :-)
You can use these to decorate cakes, brownies, desserts like mousse, ice cream etc!
Saturday, 27 August 2011
Microwave Potato Chips
Yay!!!
I've found a snack that can be made within minutes! And what's more, I don't even need oil or butter!!!! These chips were fabulous! Almost like the store-brought Potato Chips! :-)
Ingredients (to make 1 cup)
Potato - 3 medium
Salt - 1/2 teaspoon (OR as per taste)
Red Chili Powder, Paprika, Pepper powder (optional)
Microwave safe plate
Microwave
Method
1. Cut the potatoes in thin round slices. {Cut it in 2 halves, then slice thin pieces.} If you aren't able to cut them this way, then cut into thin stripes!
2. Sprinkle salt all over the slices & mix well. Arrange on a microwave safe plate. You can also arrange on the glass plate at the bottom of the microwave. If you want, apply 1 teaspoon of oil. I skipped it. You can experiment with the flavors you like. Add spices like red chili powder, paprika etc. in this step.
3. Microwave for about 5 minutes. It depends upon your Microwave power, temp etc. Experiment with it. Check on your chips every 2 minutes. But generally, it is done in 4 to 5 minutes. If your slices are thick, you may have to flip it over the other side during half-time ;-)
Your low-calorie delicacy is ready! :-)
Healthy(-ier) Noodles
If you're wondering about the title, let me tell you that Instant Noodles is NOT healthy. It (usually) is made up of refined flour which has zero nutrients! But... IT IS TASTY! ☺ I find it even more tasty when I add some vegetables & other spices! And this post it titled Healthier Noodles because by adding the veggies, you make it slightly healthier than just plain noodles!! :-D This is a very basic version of Noodles (not the CHINESE type)
Ingredients
Instant Noodles - 1 packet (I used a 200 grams packet)
Water - as per instruction on the cover OR enough to cover the noodles
Capsicum - 1medium finely chopped
Carrot - 1 medium finely chopped
Onion - 1 medium finely chopped
Any cooking Oil - 1 teaspoon
Salt - 1 teaspoon
Green Chili - 1 finely chopped
Garlic - 2 cloves finely chopped (optional)
If you don't get the ready to use garnish powder (tastemaker) with your noodles, you can substitute it with the following spices -
Salt - 1 teaspoon
Groundnut powder - 1 teaspoon
Turmeric Powder - 1 teaspoon
Onion Powder - 1 teaspoon
Cumin Powder - 1 teaspoon
Red Chili Powder - 1 teaspoon
Garam Masala - 1 teaspoon (optional)
***Mix them all together and use instead of the taste-maker / ready to use powder given in the noodles' packet.
To make the noodles -
1. Heat the oil in a wok. Add the garlic & sauté for 1 minute.
2. Add the chopped onions & sauté until it is a little soft (around 1-2 minutes on high flame)
3. Next, add the chopped carrot, green chili and capsicum and stir fry for 1-2 minutes.
4. Add the taste maker (ready to use powder given in the packet of noodles). If not, add the alternative powder mix as given above. Let it cook for 1 - 2 minutes.
5. Add the water. (You can adjust the amount of water later on too. So, adopt a conservative approach while pouring water into the wok.) Let it be on high flame until it starts to boil.
6. Add the noodles now. You can either break them and add or add it just like that. I don't break them because I like my noodles to be long & connected so that it is fun while eating with a fork! :-)
7. It has to cook on high flame for about 2-5 minutes (you'll know when it is done. the water would have evaporated & the noodles is soft)
8. Remove from heat, garnish with some coriander / cilantro leaves & serve! ☺ ☻
Wednesday, 24 August 2011
Basic Tea / Chai
Hello there, folks!
Everyone must know how to make Tea. If you don't, then I suggest you go make yourself a cup right after reading this post. It is a basic necessity for most of us! :-D
While it is not advisable to drink a lot of tea in a day, a small cup won't do any harm. Most people drink tea at night to keep themselves awake or in the morning to jump-start their day. Neither of the times is advisable. Tea in the morning masks your hunger {eventually leading to overeating & weight gain}. Tea at night causes acidity in the morning! However, if drunk at the right time, it can be amazing! The best time to have your tea is in the evening along with a healthy snack.
There are many ways of making tea. I'll get to the different types one by one. But in this post, I'm gonna talk about the basic ginger tea.
To make 2 cups of Tea
You'll need -
Tea Leaves - 2-3 teaspoon {Add more if you want a strong taste}
Water - 1 1/2 cups
Sugar - 2-3 teaspoons {More or Less as per your taste}
Ginger - 1 inch
Cardamom / Elaichi powder- 1 teaspoon {if you don't have the powder, either grind in a blender OR smash the cardamom roughly.}
Milk - 3/4 cup {If you want more milk, decrease the water & vice versa}
Method -
1. You don't need to peel the ginger skin. Just wash it well & smash it roughly {or cut into fine pieces}. Same goes for cardamom/elaichi (in case you don't have the powder)
2. In a saucepan, put the water, tea leaves/powder, ginger, cardamom & let it boil. (takes about 1-2 minutes)
3. Some people prefer to have their tea without the milk. In that case, just filter out the tea into a teacup, add the sugar & have it.
4. If you like your tea with milk, add the milk once the water-tea leaves mixture comes to a boil. Then, let it boil in low flame until it rises. Switch of the flame, pour into a cup, add sugar & enjoy! ☺
** Initially, add the sugar afterwards. But once you know how much sugar you take, you can add the sugar along with the tea leaves in the beginning. It dissolves completely!
P.S: Will upload pictures by tomorrow!
Monday, 22 August 2011
Callanetics - 10 years yonger in 10 hours
Well hello bloggers & bloggies!! :-P
I'm here to talk about another one of my favorite workout videos. Yeah, you read the title. Although it appears like an unreasonable claim; {10 years younger? No rational person would believe that!} I think it is safe to establish that Callanetics can firm you up faster than anything I'm aware of. I'll get to the specifics...
The exercises are deceptively simple yet amazingly powerful. It won't make you lose weight. But it will firm you up noticeably in an amazingly short time, though. So the "10 hours" claim isn't mere hype.
Callanetics: 10 Years Younger in 10 Hours was the first exercise program to be released by Callan Pinckeny. Her fame spread slowly through word of mouth. She focuses on the method of doing the exercises rather than number of repetitions. Her soothing voice, smiling face and unbelievably fit body gives all the push you need to do the workout! She's the one in red. She's over 60 years old!!
Callanetics: 10 years younger in 10 hours (We'll call it 10/10 now onwards) is a 50 minutes workout video. They are non-impact exercises. Very gentle & very soothing. You hold a pose & isolate the muscles in that region. Then you move it by quarter to half of an inch back & forth. This tiny movement makes all the difference! At the end of 50 minutes, you'll feel fresh and really good. You won't even feel like you've "worked out".
Callanetics in itself may be an excellent workout to maintain flexibility and shape. But I wanted to lose some fat quickly before my birthday. ;-) Hence, I've been doing Tae-Bo Cardio too. I think its a perfect combination. Cardio to lose the weight & Callanetics to firm up! Can't wait for 29th August! The VERDICT day.. :-D
Saturday, 20 August 2011
Tae Bo Cardio
Hi friends!
This is my very first post on an exercise video ever since I modified the purpose of this blog. I prefer working out at home rather than going to a gym. {I'll try that too, very soon} And exercise videos are the best way to do that! There are so many choices that you never get bored! All you have to do is lift you butt OFF that couch and dedicate sometime towards your body. It is believed widely that a 20 minute exercise everyday keeps you fit and fine.
Now, I'm going to try a 10 day boot-camp workout. Like I said, my birthday is on the 30th of August. I would really like to look a little less chubby by then! :-D And given my past yo-yoing with exercise, I know for sure that if I set my mind to it, I can easily lose at least 3-4 kgs in 10 days.
I've found that Kickboxing & Weight training are the two best ways to lose fat quickly. By quickly, I mean you get to see a drop initially. However, you must be consistent in order to achieve the long term goal of health and fitness.
In the kickboxing genre, Billy Blanks is the ultimate! He's my favorite trainer! He's sweet, inspiring and pushes you to your limits! Today, I tried Billy Blanks' Tae Bo Cardio. I don't know if this is illegal, but I found the video links on Youtube. I'm merely posting the links here :-
Tae Bo Cardio - Part 1
Tae Bo Cardio - Part 2
Tae Bo Cardio - Part 3
Tae Bo Cardio - Part 4
Tae Bo Cardio - Part 5
This video is around 45 minutes. At the end of the video, I feel NOT TIRED, but actually ENERGIZED! Its a miracle! I gave this workout everything I had! Inspite of knowing I might be making mistakes with some of the exercise moves, I kept going. All I had in mind was a fit body & my readers (I wanted to appear like a hero, hence I wanted to complete the workout! :-D) It keeps you moving and sweating and definitely gets your heart going. For fat burning, the heart beat has to be increased to a certain level. Billy Blanks succeeds in achieving that! You'll find kicks, punches, dance steps and some Yoga stretches all broken down into 4 sets of 8 beats each. Even if you manage to do 3, you'll go a long way in achieving that goal...
You'll need to keep a bottle of water & a towel close by coz you're gonna sweat sweat sweat baby! ;-)
Although this is the first day of my workout, I already feel lighter! I'm planning on doing this workout this week along with Callanetics. I will add the final verdict after 8 workout sessions {29th August 2011} are complete.
Stay Tuned...
Pani Puri / Gol Gappa (Indian Street Food)
If you haven't had the Mumbai's Pani Puri, you really are missing something amazing! Pani Puri or Gol Gappa (as they call in Delhi) is one of the most popular street foods in India. Ever since I learned how to make it so easily at home, I've stopped grazing on the Mumbai streets. ;-)
I've borrowed this recipe from my Mother. Her traditional recipes are mouth-watering! I've decided to learn her secrets in the next few months. I can always attempt the other cuisines any time I want!
Take a look -
So, let us understand what a Pani Puri really is.
- There is a Puri/Puchka. Its a fried goodie.You'll find it in most Indian stores. But in case you're unable to find it, you may very well make it at home before-hand. Read about making the Puri at home.
- Filling can be either Ragda {Read here} or just sprouts, boiled & mashed potatoes etc.
- According to your taste, you can add or leave out the sweet tamarind chutney / sweet tamarind-dates chutney.
- Of course, the Pani (means water). It is made up of Mint leaves & other spices. It forms the main part pf Pani Puri.
Ingredients
For the Mint Pani (flavored Mint water)
Mint leaves - 1 cup (150 grams)
Coriander leaves - 1/2 cup (80 grams)
Green chillies - 3-4 chopped
Ginger - 1 inch (optional)
Salt - as per taste (2 teaspoons)
For the Sweet Chutney
Click here.
Add warm water to the thick paste & make it into pouring consistency.
For the Filling
Make the Ragda before itself.
Other than Ragda, you can stuff it with boiled & mased potatoes, boiled sprouts & onions etc.
Method
For the Mint Water
1. In a blender, add the Mint, Coriander, Green Chilis, Salt & ginger (optional) and grind well to form a thick & smooth paste. This can be stored for 2-3 days.
2. If you want to make 1 glass of Pani Puri's liquid, add about 2 tablespoons of this thick paste, fill the rest with ice cold water, add some Chaat Powder (if you don't have, add some black salt & pepper), 1/2 teaspoon chili powder if you want it spicy & mix well. I don't like even a tiny leaf particle to come in my moth. So after mixing it all together & adjusting the salt, I just run it through a filter/sieve to separate the coarse leaf particles
*** If you don't want to go through all this process, you can buy the ready-made Pani Puri Masala from you store. {CHECK AD} All you have to do is mix the powder with some ice cold water & you're good to go! :-)
ASSEMBLING IT ALL TOGETHER :
So, once we have everything it place, all we have to do is bring it all together. This is how a street vendor would give me a Pani Puri.
A. Get a small plate & arrange the Puris
B. Crack a small hole on the Puri.
C. Add a spoonful of Ragda (or any other like Mashed Potatoes + Salt filling) in it.
D. Dip it in the liquified sweet chutney. (Skip it if you want spicy. If you want really sweet - dip more into it)
E. Finally, dip it into the Mint-Water & immediately eat!!!
Yummmmmmmmmmmm!!!!! :-)
I've borrowed this recipe from my Mother. Her traditional recipes are mouth-watering! I've decided to learn her secrets in the next few months. I can always attempt the other cuisines any time I want!
Take a look -
So, let us understand what a Pani Puri really is.
- There is a Puri/Puchka. Its a fried goodie.You'll find it in most Indian stores. But in case you're unable to find it, you may very well make it at home before-hand. Read about making the Puri at home.
- Filling can be either Ragda {Read here} or just sprouts, boiled & mashed potatoes etc.
- According to your taste, you can add or leave out the sweet tamarind chutney / sweet tamarind-dates chutney.
- Of course, the Pani (means water). It is made up of Mint leaves & other spices. It forms the main part pf Pani Puri.
Ingredients
For the Mint Pani (flavored Mint water)
Mint leaves - 1 cup (150 grams)
Coriander leaves - 1/2 cup (80 grams)
Green chillies - 3-4 chopped
Ginger - 1 inch (optional)
Salt - as per taste (2 teaspoons)
For the Sweet Chutney
Click here.
Add warm water to the thick paste & make it into pouring consistency.
For the Filling
Make the Ragda before itself.
Other than Ragda, you can stuff it with boiled & mased potatoes, boiled sprouts & onions etc.
Method
For the Mint Water
1. In a blender, add the Mint, Coriander, Green Chilis, Salt & ginger (optional) and grind well to form a thick & smooth paste. This can be stored for 2-3 days.
2. If you want to make 1 glass of Pani Puri's liquid, add about 2 tablespoons of this thick paste, fill the rest with ice cold water, add some Chaat Powder (if you don't have, add some black salt & pepper), 1/2 teaspoon chili powder if you want it spicy & mix well. I don't like even a tiny leaf particle to come in my moth. So after mixing it all together & adjusting the salt, I just run it through a filter/sieve to separate the coarse leaf particles
*** If you don't want to go through all this process, you can buy the ready-made Pani Puri Masala from you store. {CHECK AD} All you have to do is mix the powder with some ice cold water & you're good to go! :-)
No step by step pics, Sorry! ☺ |
ASSEMBLING IT ALL TOGETHER :
So, once we have everything it place, all we have to do is bring it all together. This is how a street vendor would give me a Pani Puri.
A. Get a small plate & arrange the Puris
B. Crack a small hole on the Puri.
C. Add a spoonful of Ragda (or any other like Mashed Potatoes + Salt filling) in it.
D. Dip it in the liquified sweet chutney. (Skip it if you want spicy. If you want really sweet - dip more into it)
E. Finally, dip it into the Mint-Water & immediately eat!!!
Yummmmmmmmmmmm!!!!! :-)
Friday, 19 August 2011
Mini Pizza
Hard day at work/school/college? Bored to cook something elaborate?! Here's the perfect solution! Mini Pizzas! they'll get done in 10 minutes & you can eat them to your heart's content! ;-) So, i was wondering what to make for this weekend. I'm actually very busy with college-work-classes-studies that I hardly find time to cook! And it is going to be hectic for another 8-9 months. But I promise, the blog wont be dormant. I'll find time to make a thing or two. :-) Anyhoo, back to Mini Pizzas. You can do whatever Magic yo want with them! Here's what I did.
Things you'll need -
Mini Pizza Bread - you'll get them in the store {Or make them with normal bread slices}
Tomato Ketchup (or Pizza Sauce)
Butter - 2 tablespoons
Pepper Powder - 2 teaspoons
Onion - finely chopped
Tomato - finely chopped
Capsicum - finely chopped
Mozzarella cheese
Salt - to taste
Oregano/ Chili Flakes
To make -
1. Arrange your Pizza Bread on a plate, grill
2. Use the Pizza Sauce if you have at home. If not, we can make a delicious Pizza spread with Ketchup. In a microwave safe bowl, add ketchup, butter, pepper, oregano & a pinch of salt & heat it for about 30 seconds. Then stir it well to get a buttery spread. It smells amazing!
3. Apply a spoon of the Sauce on all the Pizza Breads. Add some onion slices on it.
4. Add some tomato & capsicum slices too. Don't keep too much or the veggies will fall down. Also grate some Mozzarella cheese on top.
5. Put it on the Microwave-Grill & heat it for about 2 minutes & then set it on grill for about 2 minutes. Your mini Pizza is ready! :-) Sprinkle some oregano & chili flakes & enjoy!
Subscribe to:
Posts (Atom)